Understand KORONA.studio synchronization
KORONA Event support connects the KORONA.studio ecosystem module before the account is handed over. Use this article to understand which system owns shared data and when synchronized changes become available.
Before you start
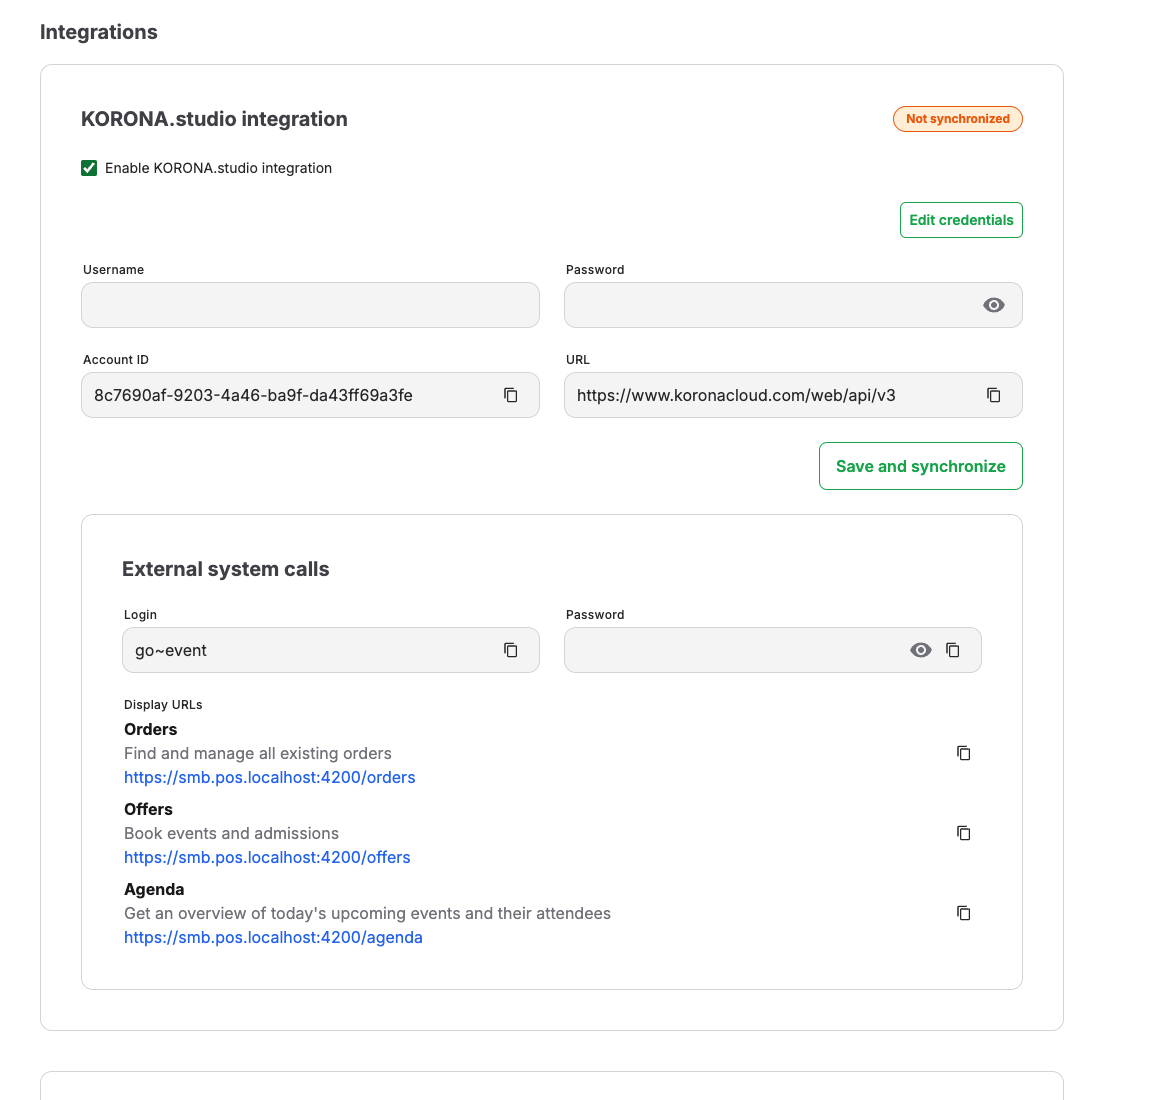
Know which KORONA.studio account owns this KORONA Event account's master data. Do not replace the KORONA.studio synchronization credentials or service URLs unless KORONA Event support asks you to. The KORONA POS external-call API key described below is separate and can be replaced through user management.
Find the synchronization status
- In the back office, open Admin > Integrations.
- Find KORONA.studio integration.
- Use Last successful synchronization to see when the most recent import completed.
- If the connection is missing or synchronization fails, contact KORONA Event support. Do not create duplicate master data in KORONA Event while the connection is being repaired.
What synchronizes in each direction
From KORONA.studio into KORONA Event:
- products and their prices
- payment methods, currencies, and sales taxes
- points of sale, cashiers, organizational units, and sectors
- tags, ticket definitions, customer groups, and economic zones
- voucher configurations and vouchers, when the voucher package is active in the KORONA account
- receipts, imported on a recurring schedule
From KORONA Event to KORONA.studio:
- invoices and fiscal delivery notes
- customer records attached to orders, including a company's Leitweg-ID when present
- tags created in KORONA Event
Customer imports also carry a KORONA.studio buyer reference into KORONA Event as the company's Leitweg-ID. KORONA Event-created e-invoices use the value stored on the customer when the invoice is issued; changing it later does not rewrite an existing invoice.
After the first synchronization, imports repeat approximately every 15 minutes and exports run continuously. Temporary failures are retried automatically and can delay updates. Last successful synchronization shows when an import last completed successfully.
Choose a default cashier
Under Admin > Integrations > KORONA.studio integration, select Default cashier, then Save and synchronize. Choose an active cashier who is appropriate for these exports. KORONA Event never chooses a default automatically.
Invoice and delivery-note exports for online shop or API orders without a staff user depend on this default. A warning appears when the integration is enabled and no eligible default is selected. For staff orders, an eligible cashier assigned to the user takes precedence.
KORONA Event links a user's cashier automatically when there is exactly one eligible cashier with the same email address, ignoring capitalization. This applies when cashiers are imported and when a user joins the account, including through an invitation. Existing assignments are kept. If the email matches several eligible cashiers, choose the correct assignment in Admin > Users.
After correcting a missing cashier, failed delivery notes are retried automatically within about an hour. Do not recreate the order to trigger another export.
Online shop prices during a cart-service outage
If the KORONA cart service is temporarily unavailable, ordinary online bookings can continue using the prices stored in KORONA Event. Automatic discounts that require the unavailable service are not applied. Customers see the local cart total without an outage notice. Existing voucher-owned prices and receipt limits still apply.
An external coupon code must be validated before it can be used. If validation is unavailable, the customer receives an error and can retry later or remove the code to continue at local prices. Locally configured promotion codes remain subject to their normal rules. Completed orders are not repriced automatically when the service recovers.
External system calls
Once this feature is enabled, KORONA Event manages the receipt-cancellation callback for every imported POS profile. When fiscal delivery-note processing is enabled, it also manages the delivery-note-finalization callback. Existing external system calls on a profile remain in place, and KORONA Event does not change their KORONA numbers.
Open Admin > Integrations and find External system calls to review these callbacks. Synchronized means the calls are attached to the imported POS profiles. If a callback shows Needs repair or Not synchronized, select Synchronize and repair. The next successful full KORONA.studio import also repairs the managed callbacks.
The section continues to show the Login, a masked Password, and root Display URLs for Orders, Offers, and Agenda. Accounts with managed external system calls use the stable login KORONA_EVENT; other accounts keep their existing platform login. The masked password identifies the configured API key but cannot reveal its secret.
To configure or replace the password, you need permission to manage users:
- Open Admin > Users and select the dedicated integration user for the KORONA POS connection.
- Under API keys, select Create API key.
- Copy the value from New API key immediately. It is shown only once; store it securely and enter it as Password in KORONA POS. Use the Login and required Display URLs shown under External system calls.
- After the replacement works, select Revoke API key for the old masked key. If a secret was lost before it was stored, create another key; the masked value cannot be recovered.
Publish a root POS action
On accounts with managed external system calls, an administrator can publish root actions for Offers, Orders and Agenda:
- Open Admin > Integrations > External system calls > POS display actions.
- Refresh the existing-call inventory. Review matching calls, adopt the one you want to maintain, and select Use for this action when a choice is required. Names alone do not authorize changes. Multiple intentional calls can remain in the inventory.
- Select Publish action for the screen you need. If there is no matching call after a complete inventory read, publication creates one. If the outcome is uncertain, refresh and adopt the resulting call before retrying; do not create another manually.
- Note the resulting KORONA call name and number. If KORONA has not supplied a number, its identifier is shown instead.
- In KORONA.studio, add that external system call to the appropriate POS button layout, distribute the layout, and open it on the till. Check the screen and filtering before using the button with visitors.
Publishing a call does not edit a button layout. Repeating publication reuses the selected call; its number, custom name, timeouts and approved settings remain in place. An adopted call must already open the selected screen or view. If it does not, edit its display URL in the inventory, preview and apply the change, then retry publication.
Check publication verifies an existing action. Unpublish action deactivates its selected KORONA call; it does not delete unrelated calls or remove layout buttons. Receipt cancellation and conditional fiscal delivery-note completion remain separate callbacks attached to POS profiles, rather than display actions assigned to buttons.
For a version 1 display action, use GET and leave the system callback URL empty. Review calls with different launch settings in the inventory before publication.
The displayed action version identifies the defaults selected when the action was created. Synchronization maintains approved settings; publishing newer software does not upgrade existing actions or switch GET launches to POST.
Publish a saved view as a POS action
- Open the relevant list in the back office and save the filters the cashier should use.
- Select the saved view, open its action menu, and choose Publish as … POS action for an available destination.
- Use the resulting call name/number and the same KORONA.studio button-layout handoff described above.
| Saved-view list | POS destination | Supported filters |
|---|---|---|
| Orders | Orders | Native order filters, including state, customer, product, event and tag filters |
| Events | Agenda | Native event filters, including event templates, resources and tags |
| Event templates, Admissions, Products, Vouchers | Offers | Text and tags only; the saved-view list also restricts the offer type |
For Offers, fields such as location, date, publication state, price, product attributes and sorting are unavailable. Event-instance and order views cannot be published to Offers. The menu explains unsupported fields; remove them from the view or use its native destination. Offers continues to show only items eligible for the active POS, so unpublished or unavailable items are not made sellable by a saved view. Search text entered on the POS replaces saved text; tag and offer-type restrictions remain. Orders and Agenda retain their screen's date and ordering controls.
Only views explicitly selected for publication get actions. Renaming or editing a view keeps the existing call name, number and approved settings. If an edit makes a published view incompatible, its launch is blocked with a saved-view message; review the filters or unpublish it. Unpublication remains available for incompatible views.
To stop offering an action, choose Unpublish … POS action in its view menu. This deactivates the selected managed call through the same verified workflow. If deactivation cannot be confirmed, the view and registration remain available for recovery. Refresh the inventory, review the error, preview/apply the pending configuration and retry. A timed-out creation must be rediscovered and adopted before cleanup, so it cannot leave an unknown active call behind. Remove the inactive button from its layout manually when no longer needed.
Before deleting a saved view with a managed POS action, unpublish the action and wait for confirmed deactivation. Deleting the view never changes KORONA calls.
Automatic saved-view publication is available only on accounts with managed external system calls and requires permission to edit saved views. Root publication requires permission to update the account's integration settings.
For accounts without managed publication, select a saved view on Events or Orders, open its action menu, and choose Copy point of sale URL. An event view's link opens Agenda with that view; an order view's link opens Orders. Copying requires permission to read saved views and an account POS address. Use the copied URL for the manually configured external system call in KORONA.studio, with the current Login under Admin > Integrations and the securely stored API key. Copying the URL does not create or change a till button.
View Feed opens a calendar subscription feed, not a till display. Do not use its ICS address as an Agenda action. If neither a copy action nor a publish action is available, contact KORONA Event support for help with your account's POS setup.
The root Display URLs under External system calls open their screens without a saved view.
Troubleshooting
| Problem | What to check |
|---|---|
| Synchronization fails immediately | Contact KORONA Event support; do not replace the KORONA.studio synchronization credentials or service URLs unless asked. |
| Section shows Not synchronized | Contact KORONA Event support before creating or changing KORONA.studio-owned records locally. |
| Products or prices are outdated | When Last successful synchronization last updated; correct the data in KORONA.studio, then wait for the next import or select Synchronize. |
| A record exists in KORONA.studio but not in KORONA Event | Whether Last successful synchronization advanced after the record changed. |
| A managed callback shows Needs repair | Select Synchronize and repair. If it fails again, record the shown error and contact KORONA Event support. |